

Step 1 Granular Dramatic Effect on Your Photos in Photoshop
Open the photo or image that you will use in this tutorial, then duplicate the background layer by clicking the right mouse button and select 'Duplicate Layer'.

Select the duplicate layer, go to the menu 'Filter' and choose the filter 'Other' -> 'High Pass', introduces the value of '5' pixel in the 'radius' and click ok.


Then change the 'blend' of the layer duplicate (already with the filter) to 'overlay'.

Step 2
Duplica novamente o layer de background original e move-o para o topo da lista de layers, selecciona o layer e vai ao menu ‘Image’ e selecciona ‘Adjustment’ -> ‘Desaturate’.

Altera o ‘blend‘ deste layer para ‘Hard Light’.
Step 3
Now you will make a 'Flatten' with your layers, that is, you will make your layers in one. Click right mouse button on any of the layers and select 'Flatten Image'. We stayed again with a single layer 'Background'.
Duplicate layer now ‘Ctrl+F’, next ‘blend’ do layer para ‘Overlay’.
Step 4
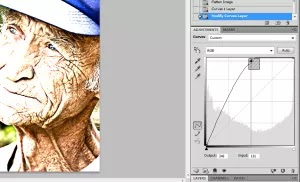
Back to do the 'Flatten' image (right-eagle rays on any of the layers and select 'Flatten Image'). Then we will create a new 'Adjustment Layer' clicking ’Create New Adjustment Layer’ , primeiro vamos desbloquear o layer, fazendo um duplo clique sobre o mesmo, (o icon está logo por baixo da palette de layers), para criar o novo layer, seleccionem o tipo ‘Curves’.

In the dialog box of the 'Curves' adds a point by clicking directly on the diagonal line, the point moves up and left (this will light the entire image, but focuses you in the eye).
Step 5
Click the layer mask of ('Adjustment Layer') we created in the previous step and press 'Ctrl + I', this will make the image appear darker. Select white as the main color, carries 'D'. Choose 'Brush Tool' and select a soft brush (I used a 13px diameter and hardness 0%), paints over the eye area for thou mayest give him shine.
Step 6
Create a new layer and change the foreground color to eye color that you prefer for your photo. I chose a navy blue (# 4f8fa4). Changes the 'blend' of the layer to 'Color'.

Now using the same brush selected earlier, paint over the eyes to bring out her eyes with the selected color. If you find that the color is too vivid / strong, tries to help the opacity of the layer.
So I come to the end of my first tutorial in this site, I hope you enjoyed! As you can see the techniques used are quite simple and can easily be used in other jobs.
If found this tutorial useful leave your comment!
0 Response to "Granular Dramatic Effect on Your Photos in Photoshop"
Posting Komentar